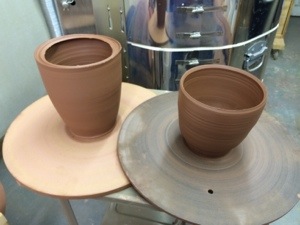
 Monday after work, I spent the evening in the studio working on throwing, including a big 2-segment vase, using what I learned this past weekend. It was a very productive session. I started with a few mugs to get warmed up. It’s been a while since I threw much of anything, so 9 mugs was a good exercise. I actually planned 10, but ended up with 9 and a cat bowl. I was pleasantly surprised to find I was throwing taller for the amount of clay than usual. Some of the “throwing big” stuff transferred nicely to throwing small.
After the mugs, I went for a bowl. It, too, was bigger than usual, and had a nice shape. I think it will trim up nicely. It also had a smaller match from 0.75lbs. I like throwing bowls. There’s something satisfying about the smooth curves, and contrast of the space and the rim.
 Then came the 2-segment piece. It started with a 4lb. base and a 3lb. top half. The bottom form was pretty much what I had it in mind, with the final goal of replicating the piece I sliced open during the workshop. The top part ended up a little thinner than I planned, partly because I got into pulling it up. Ultimately, that worked fine, though I was a bit concerned. After throwing the two halves and preparing the rims and matching diameters, it was way later than I had intended to stay. I covered the mugs and bowls and left the halves to dry.
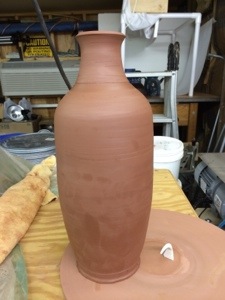 This morning, I got back into the studio early, before going into the office. The halves were perfect. A quick score and slip and they were joined. I worked the seam together as we were instructed, and the initial form looked pretty good. Opening a hole in the top and pulling up the neck went smoothly. There was sufficient moisture in the foot of the top half to make it fairly easy to do the shaping. A little later, the vase was ready for some decorative handles. It is now drying, waiting to be joined by a bevy of mugs and bowls on the drying rack.
I was pleased that the process worked as well at home as it did in the workshop. I did add a couple tools, including a homemade giant sponge on a stick. (Tip: cut a slot in the sponge. Insert the stick to make sure it fits. Remove the stick and apply a little White Gorilla glue to the stick, and work it back in place. The sponge will wear off the glue before it comes loose.)
I’m also looking into a propane torch setup for spot drying while making big pieces. Any suggestions are welcomed. This isn’t an area I have much experience with, so if you’re using a propane torch, I’d be interested in knowing what kind, and how you like it.
I think it’s going to be fun making big pottery now and then. Jeff Dean said he tends to do a couple per firing. Sounds like a good plan.

Very cool piece. That is great you were able to carry over the experience at the workshop. I am impressed.
Thanks for sharing what you learned……
I have a question on how you were taught to join the two halves together? You said you worked the seams together? is there a special way to work the seams? I think I know how you set up the two pieces for joining together by creating a ledge to place the top piece onto. I have never tried to join two pieces together to create a large pot and that I think would be cool to try… Thank you…Connie
The technique we discussed in the workshop was to draw a rib over the seam diagonally from the lower half to the upper half. This seemed to be the instructor’s preference although a more vertical motion was also considered acceptable. I did both and enjoyed the diagonal more, though I can’t say why. I did the outside first, then the inside, smoothing the seam, then worked a bit more to get the shape the way I wanted it. I used a green MudTools kidney rib with good results. Ultimately, I can’t see where the seam is exactly on the outside.
Thank you… I may have to give it a try to create a large face jug….(*-*)
Excellent idea. With the bigger surface, you could really get wild.